And with Mother's Day around the corner, I knew I had to make my mom something that every mom needs:
something to help her clean the house more efficiently. DUH!
I had originally decided to make this bucket caddy for a 5 gallon bucket for her to use out in her garden.
(Mad props to mom and dad for building this 8 foot long self-irrigating garden!)
But mom had other ideas... and tada!
The CLEANING CADDY: for people who clean so efficiently they need to carry everything with them all the time.
Materials:
- 1 yard laminated fabric or oilcloth (I used oil cloth and I loved working with it. Yay for new experiences!)
- 12 yards coordinating bias tape (I know it seems like a lot)
- Coordinating thread
- Sewing machine and sewing machine stuff
- Pattern from One Yard Wonders: Fabric by Fabric (Or you can eye ball it, which is fine too)
- Scissors
1. Cut two of each of the following pieces from the fabric:
- Side Panels: 24" x 18" with rounded corners
- Exterior Pockets: 6" x 18" rounded at the bottom like the side panels
- Interior Pockets: 10" x 8" round at the bottom.
2. Add bias tape to the tops of the exterior pockets.
3. Attach the exterior pockets to the side panels, aligning them along the bottom. (In this picture, it's upside down, but it really doesn't matter)
4. Mark the back of the fabric with divisions for pockets on the exterior pockets. Four pockets work best, but you can do what works best for your needs.
5. Sew along these lines.
6. Apply bias tape all around the interior pockets.
7. Attach the interior pockets to the side pockets, like so.
It'll look like this.
8. Sew bias tape around the whole side panel.
9. Remove cat.
Ahem, I said REMOVE CAT!!
10. Cut 8 ties from the remaining bias tape, roughly 14 - 16" each.
11. Sew the open sides of the bias tape together, as well as the ends.
12. Attach two ties to each side of the side panels, one where the top of the exterior pocket is and one about 3-4" above that one.
Go over the attachments several times so it's secure.
And you're done. Here's some pictures!
(Make sure you do both!)
This is how my mom used it:
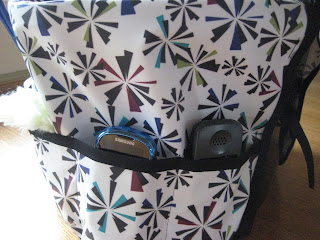
You fold the side panels over the sides of your bucket and tie the bottom ties below the handle and top ties above the handle. Then you can fill it with stuff. Mom likes to carry her to-do list and phones in the exterior pockets.
So if you know some one who loves to clean and likes to be uber organized when they clean, this could be a lovely something to make. :)
Toodles.


